Range practice
How to fix a slice at the range: a practice plan, not just tips
A slice is a face open to your swing path. Sort your slice by where it starts, pick one fix, and follow a 45-minute range plan to practice it.
By Teeo team · Published · Last reviewed
The short answer
A slice happens when the clubface is open to your swing path at impact, so the ball curves right (for a right-handed golfer).
- Sort it first
- Where the ball starts tells you whether to work on the face, the path, or both.
- One fix per session
- Pick the check that matches your slice. Practice it in slow swings, then with balls.
- Measure the change
- Watch the start line and the curve on every ball. Film a few swings and compare them next time.
What is a slice, really?
A slice is a shot that curves hard to the right for a right-handed golfer (to the left for a left-handed golfer). A small curve that you plan is a fade. A slice is the same curve, only bigger and not on purpose.
On a centred strike, the ball curves right because the clubface points right of the direction the club is moving. TrackMan calls this gap face to path. If the face is open to the path, the ball curves right. If it is closed to the path, the ball curves left. The bigger the gap, the bigger the curve. (Off-centre strikes add their own curve. See the contact check.)
Our article on why a golf ball curves explains the physics: the gap tilts the ball's spin axis, and a tilted axis bends the flight. For practice, you only need the short version. Old advice says the ball starts along your swing path and curves with the face. For a centred strike, measured data show the reverse: the ball starts mostly where the face points.
How much does a small gap matter?
TrackMan gives these examples for centred strikes:
| Shot (TrackMan example) | Face open to path | Curve to the right |
|---|---|---|
| PGA TOUR driver, about 275 yards carry | 5 degrees | about 44 yards |
| LPGA Tour driver, about 218 yards carry | 2 degrees | about 14 yards |
| PGA TOUR 6-iron, about 183 yards carry | 2 degrees | about 8 yards |
| LPGA Tour 6-iron, about 152 yards carry | 5 degrees | about 14 yards |
These are TrackMan's examples for tour-level shots, not predictions for your swing. Compare the 2-degree rows: the LPGA driver curves about 14 yards, the tour 6-iron about 8, and the driver also flies further. A few degrees of gap turns into a big curve with the driver, and a much smaller one with an iron. That is why many golfers slice the driver and hit their irons fairly straight. It is also why this plan starts with a mid-iron.
Where does your slice start?
Every slice curves right, but not every slice starts in the same place. Stand behind the ball, pick a target, and watch where the ball goes in the first part of its flight. That is the start line. It mostly follows the face, but the path moves it a little too. TrackMan's rule of thumb, quoted by Titleist, is that about 85 percent of a driver's start direction comes from the face, and about 75 percent for a mid-iron.
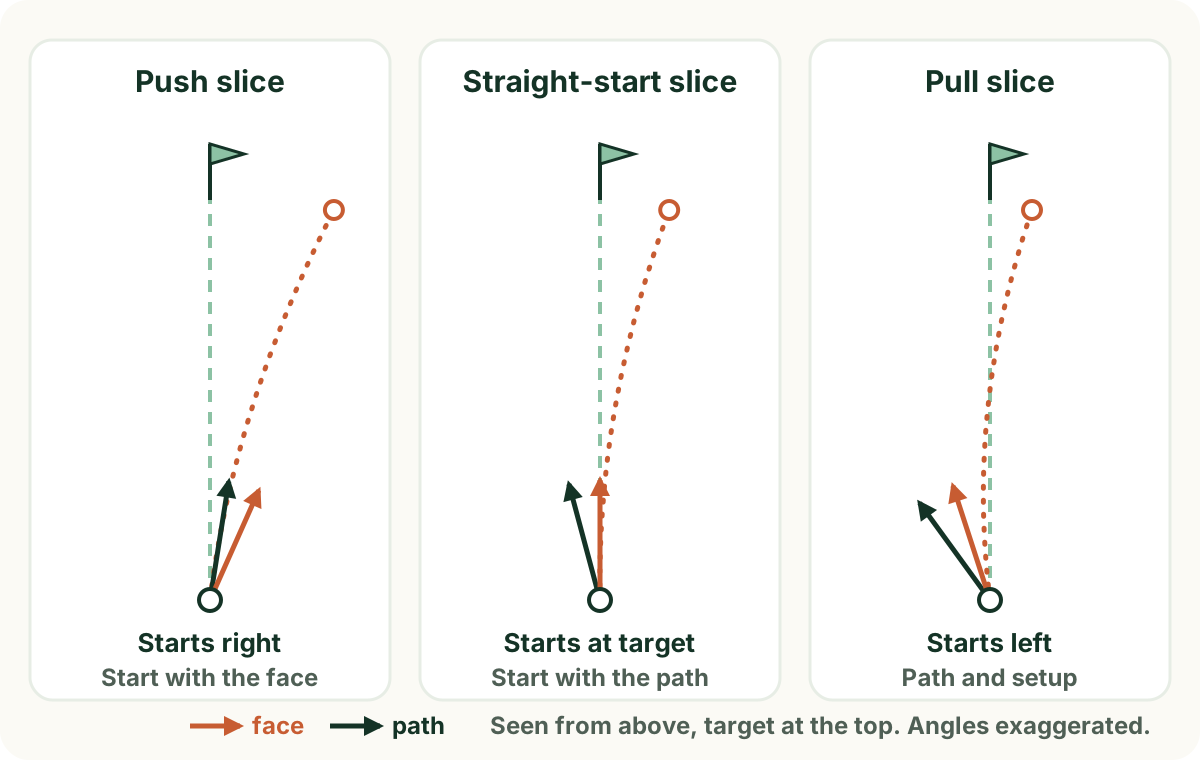
- Starts right, curves more right (push slice). Usually the face points right of the target at impact, and even more right of the path. Start with the face: grip, and how the face turns in the swing.
- Starts at the target, curves right. Usually the face is near the target and the path moves left. Start with the path.
- Starts left, curves back right (pull slice). Usually the path moves well left (out-to-in) and the face points left too, but less than the path. This is the classic "over the top" slice. Start with the path and your setup.
Look at 10 balls, not one. Write down how many start right, straight and left. Most golfers find one pattern that shows up most of the time. The pattern tells you what to check first. It is not a full diagnosis.
Before the drills: check your setup
Many slices start before the club moves. These are common coaching checks. Do them in this order, and change only one at a time.
- Aim. Lay an alignment stick (or a club) on the ground, parallel to your target line. Many slicers aim their body left to allow for the curve. That left aim makes an out-to-in path more likely, and the slice gets worse.
- Grip. Look down at your lead hand (the left hand for a right-handed golfer). If you can see few or no knuckles, the grip may be weak, which makes it harder to square the face. Set the clubface square to the target first. Then regrip with your left hand turned slightly to the right until you see two to three knuckles, and fit your right hand around it. Treat this as a checkpoint to try, not a position everyone must copy. Do not overdo it. A grip that is too strong can turn a slice into a hook.
- Ball position. For the 7-iron in this plan, start with the ball slightly forward of the centre of your stance. With the driver, inside the lead heel is a common starting point. A ball too far forward can pull the shoulders open at address.
A grip change feels strange at first. Give it a full session before you judge it. If you work with a coach, ask before you change your grip.
Range drills for a slice
Pick the drill that matches your start-line pattern. Use a 7-iron, tee the ball low, and make half to three-quarter swings at first. Speed comes later.
1. Start-line gate: for the face
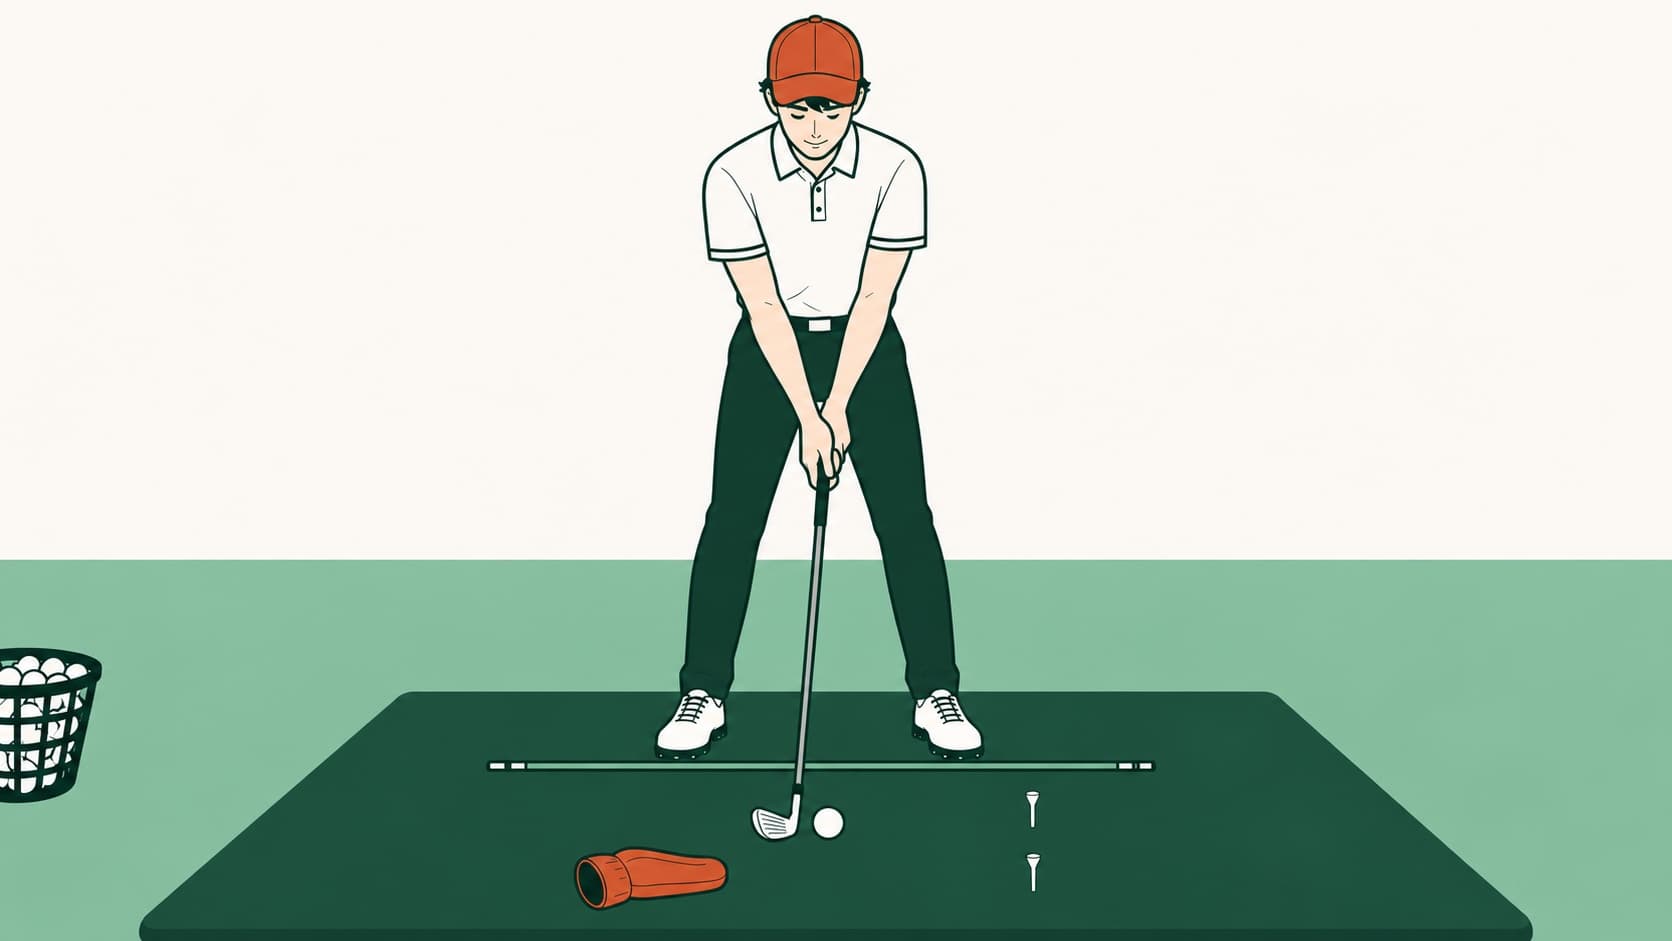
Push two tees into the ground about 3 feet (1 metre) in front of your ball, about 6 inches (15 cm) apart, one on each side of your target line. Make the gate narrower as you get better. The goal is simple: start the ball between the tees. You are not trying to stop the curve yet.
This drill trains the face, because the face mostly sets the start line. If most balls start right of the gate, the face is open to the target. Check your grip and try to feel the clubface turn over through impact. PGA coach Andrew Rice makes the same point on GOLF.com: a draw comes from a face that is closed to the path, and many golfers swing over the top because their face is open. When most balls start inside the gate, move to the path drill.
2. Headcover drill: for the path
This is a well-known drill. GOLFTEC describes it this way:
- Place a headcover about 4 inches outside the ball and 6 inches behind it, along your target line.
- Take the ball away. Make slow practice swings without touching the headcover on the way back or the way down.
- Speed up little by little until you can make full practice swings without touching it.
- Put the ball back and start again with slow half swings. If you touch the headcover, stop and reset.
If you keep hitting the headcover on the way down, the club is probably coming from outside the line, the out-to-in path behind most pull slices. Start with a soft headcover, not a hard object, and only make slow swings until you can miss it. GOLFTEC also says the drill is only a starting point. It works on the path, not the face.
3. Contact check: for the driver
With a driver, where you hit the face also changes the curve. A strike toward the heel tends to add slice curve, and a strike toward the toe tends to add draw curve. Our curve article explains why. Spray a little foot powder or dry shampoo on the face, or use face tape, and hit five drives. If most marks sit near the heel, work on centred contact before you change your swing.
A 45-minute range plan for a slice
| Time | What to do | What to check |
|---|---|---|
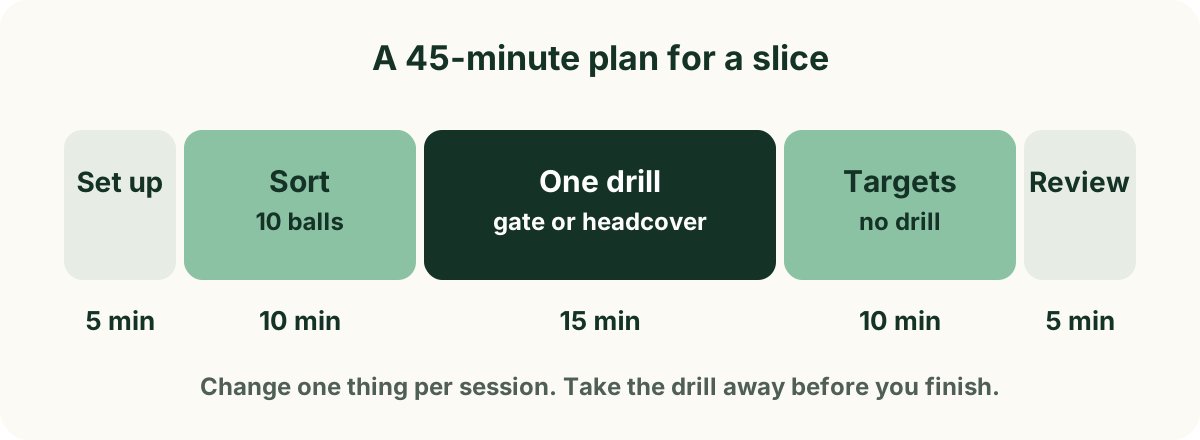
| First 5 minutes | Warm up with easy swings. Do the aim, grip and ball-position checks. Film one swing from behind. | Body lines parallel to the alignment stick. |
| Next 10 minutes | Hit 10 balls with a 7-iron at one target. Write down where each one starts and which way it curves. | Your most common pattern: right, straight or left start. |
| Then 15 minutes | Do the one drill that matches your pattern: the start-line gate for a right start, the headcover drill for a straight or left start. Slow swings first, then balls. | Start line inside the gate, or no contact with the headcover. |
| Then 10 minutes | Take the drill away. Pick a new target for each ball and use your normal routine. | Does the curve get smaller when you are not thinking about the drill? |
| Last 5 minutes | Film 3 swings. Compare one with your first clip. Write a short note. | Fewer balls starting left, or less curve to the right. |
Change one thing per session. If the setup checks fixed most of it, stay with that and skip the drills. Bring the driver in only when your 7-iron curve is smaller in two sessions in a row. For a general structure for range sessions, see how to practice at the driving range with a clear plan.
How do you know it is working?
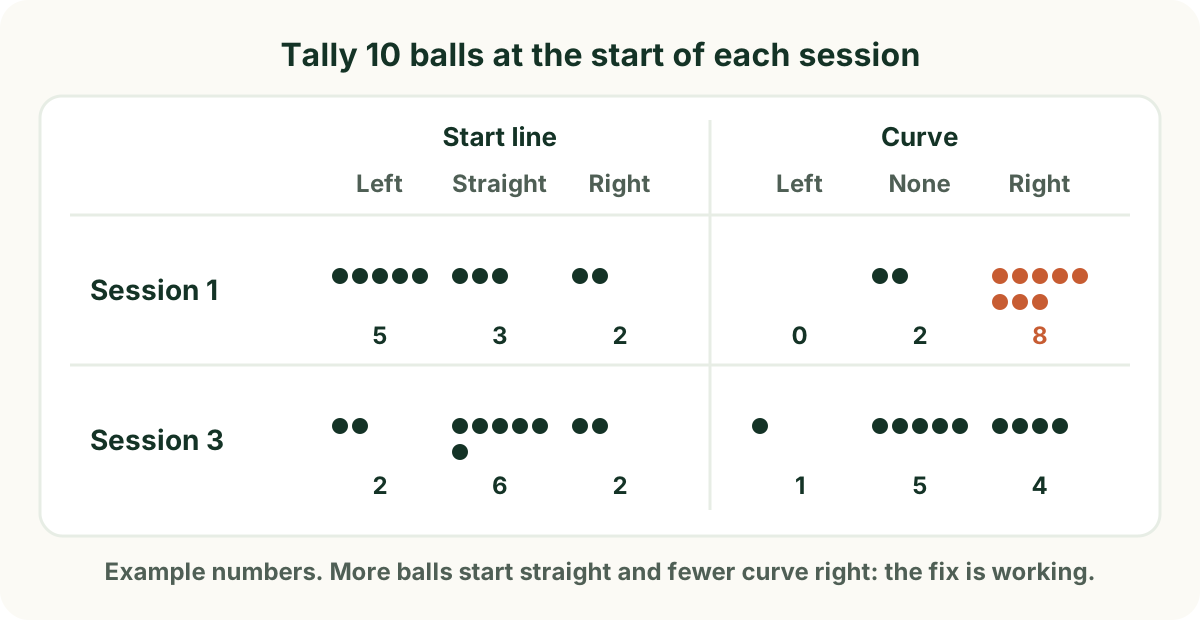
Count, do not guess. At the start of each session, hit the same 10 balls with the same club and tally the start line and curve. If the share of balls that start on line goes up and the right curve gets smaller, the fix is working. One good bucket is not proof. Look for the change across two or three sessions.
Video helps with the swing side. Film from the same spot each time and compare the same moments, for example the top of the backswing and the start of the downswing, to see whether the club still moves outside the line. If you also early extend, you may see the hips move toward the ball in the same clips. Our article on early extension covers that check.
What this does not cover
This article gives you a way to sort your slice and a starting set of drills. It does not replace a lesson. If your slice has not changed after three or four sessions, or the fix in one part of your swing creates a new miss, a coach can watch you in person and find the main cause faster.
A launch monitor can measure face angle and club path in degrees. This article does not need one, but without one, you are reading the face and path from the ball flight, which works best on centred strikes and in light wind. Wind, a poor lie or a hard mis-hit can change one ball. Look at patterns across many balls.
All examples are for a right-handed golfer. If you play left-handed, reverse left and right. If you have pain in your wrists, elbows, back or shoulders, stop and see a medical professional before you change your grip or swing.
Common questions
Why do I slice my driver but not my irons?
The driver has less loft and the ball flies faster and longer, so the same face-to-path gap makes more curve. In TrackMan's examples, a 2-degree gap curves an LPGA Tour driver about 14 yards and a PGA TOUR 6-iron about 8 yards. Many golfers also swing harder with the driver.
Should I just aim left to allow for my slice?
It can help you find the fairway for today's round. As a practice habit, it often makes the slice worse, because aiming left encourages an even more out-to-in path. On the range, aim at the target and work on the cause.
Is a strong grip the fix for a slice?
It is one of the most common fixes when the face is open. It does not help if the main problem is an out-to-in path with the face already left. Sort your slice by start line first. Change the grip a small amount, and stop if you start to hook.
What is the difference between a fade and a slice?
Both curve right for a right-handed golfer. A fade is a small, controlled curve that you plan for. A slice is a larger curve that you did not plan and that usually costs distance.
How long does it take to fix a slice?
It depends on the cause. A setup or aim fix can change things in one session. A grip change or a new path usually takes several sessions before it holds at full speed. Tally your first 10 balls each session to see the trend.
Do I need a launch monitor to fix my slice?
No. The start line and the curve of the ball tell you most of what you need. A launch monitor adds exact numbers for face and path, which can help a coach, but a target, two tees and a tally card are enough to start.
Start with your next recording.
Teeo is free on iPhone during the public beta, including AI swing review with one practice priority and a drill, side-by-side comparison, and session history.